|
 |
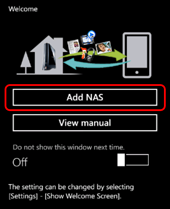
Start WebAccess, then tap [Add NAS].
|
|
 |
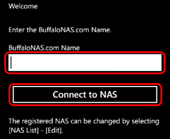
Tap [BuffaloNAS.com Name] and enter the BuffaloNAS.com name from your LinkStation or TeraStation's Web Admin interface. Tap [Connect to NAS].
 |
WebAccess may require extra steps to configure if any of the following are true:
• If UPnP is disabled in the router
• If the router does not support UPnP
• When maintenance is in progress at the BuffaloNAS.com server
Click here for more information.
|
|
|
 |
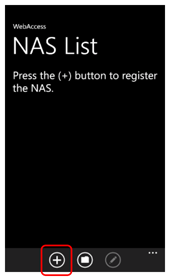
The NAS List will open.
The newly registered LinkStation or TeraStation is displayed in the NAS List and its shared folder opens.
|
The NAS information registered in this procedure can be edited by tapping  → target LinkStation or TeraStation. → target LinkStation or TeraStation.
|
This completes the registration of the LinkStation or TeraStation.
|
■ Registering from the NAS List
If you close the welcome screen, you can register directly from the NAS List with the procedure below.
|
|
|
|
Explanation of NAS List
Tap  . .
|
|
|
| (1) |
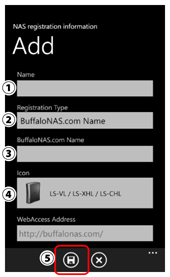
Tap [Name], enter a name for this connection, and then tap  . .
|
| (2) |
Tap [Registration Type], then select [BuffaloNAS.com Name].
|
| (3) |
Tap [BuffaloNAS.com Name] and enter the BuffaloNAS.com name from your LinkStation or TeraStation's Web Admin interface.
|
| (4) |
Tap [Icon] and choose the icon that matches your LinkStation or TeraStation.
|
| (5) |
Tap  . .
|
|
|
This completes the registration of the LinkStation or TeraStation.
|
■ Using in Regions Where WebAccess is Unavailable Due to a Firewall
You can access your LinkStation or TeraStation without going through the BuffaloNAS.com server if you use an external DNS server. This works even if WebAccess is blocked by a firewall.
|
Either use a fixed global IP address for the LinkStation or TeraStation, or route the LinkStation or TeraStation in the DNS server. Consult your network administrator for more information.
|
|
If using the LinkStation or TeraStation with NAT (where a single global IP address is shared by multiple computers) or other private address environments, port forwarding should be configured in the router. Consult your network administrator for more information.
|
|
|
|
Explanation of NAS List
Tap .
|
|
|

| (1) |
Tap [Name], then enter a name for this connection.
|
| (2) |
Tap [Registration Type], then select [DNS Service].
|
| (3) |
Enter the hostname (server fixed IP or address) and port number.
|
|
Enter your login information (username and password) if needed.
|
|
If there are other NAS devices on the local network, enter the private IP address of the LinkStation or TeraStation (example: 192.168.11.10:9000).
|
| (4) |
Tap [Icon] and choose the icon that matches your LinkStation or TeraStation.
|
| (5) |
Tap .
|
|
|
This completes the registration of the LinkStation or TeraStation. |
 from the NAS List.