| LinkStation or TeraStation Settings Procedure |
■ Configuring your LinkStation or TeraStation
|
 |
Before configuring your LinkStation or TeraStation, update its firmware to the latest version.
|
|
 |
In the Web Admin interface, navigate to [Extensions] > [WebAccess]. |
|
|
 |

Select a shared folder to publish.
 |
For best results, create a new dedicated share for WebAccess. Create a username and password before you can use any of the following functions in WebAccess: [Share], [Copy], [Move], [Rename], [Delete], [Add Folder].
|
|
|
|
 |

| (1) |
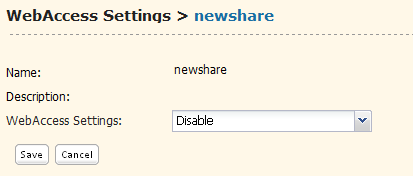
Choose one of the following levels of security from [WebAccess Settings]:
|
[Disable]:
WebAccess is not allowed.
[Allow Anonymous]:
Anyone can access (view) shared folders.
[Allow All Groups / Users]:
All groups and users registered on the LinkStation or TeraStation can use WebAccess.
[Use Inherited Folder Permissions]:
Users and groups have the same access permissions with WebAccess that they do locally.
 |
If access restrictions are not set for the shared folder, then this option will not be shown.
|
(2) Click [Save].
 |
Whether or not a given user or group can access a folder through WebAccess depends on a combination of WebAccess settings and the shared folder's settings.
[Allow Anonymous]
If this is selected, anyone can read files without logging in to WebAccess. They will not be affected by access restrictions on shared folders. For write access, an account on the LinkStation or TeraStation and login is required.
[Allow All Groups / Users]
If this is selected, then groups and users registered on the LinkStation or TeraStation can read and write files remotely if they are logged in to WebAccess. They will not be affected by access restrictions on shared folders.
[Use Inherited Folder Permissions]
If this is selected, users and groups have the same access permissions with WebAccess that they do locally. Users must log in to WebAccess to access files remotely.
Shared Folder Settings
|
WebAccess Settings |
Disable
|
Allow Anonymous
|
Allow All Groups / Users
|
Use Inherited Folder Permissions
|
Shared Folder Attributes
Set in [Shared Folders] > [Shared Folder Attributes] |
Read & Write
|
Read Only
|
Read & Write |
Read Only |
Read & Write |
Read Only |
Read & Write |
Read Only |
Accounts to access to WebAccess
|
Not Logged in
|
-
|
- |
R
|
R |
- |
- |
- |
- |
(1) Users included in [Read & Write] in [Shared Folders] > [Access Restrictions]
|
- |
- |
R/W
|
R |
R/W |
R |
R/W |
R
|
| (2) Users included in [Read only] in [Shared Folders] > [Access Restrictions] |
- |
- |
R/W |
R |
R/W |
R |
R |
R |
| (3) Users who belong to a group included in [Read & Write] in [Shared Folders] > [Access Restrictions] |
- |
- |
R/W |
R |
R/W |
R |
R/W |
R |
| (4) Users who belong to a group included in [Read only] in [Shared Folders] > [Access Restrictions] |
- |
- |
R/W |
R |
R/W |
R |
R |
R |
| Users not included in (1) to (4) above |
- |
- |
R/W |
R |
R/W |
R |
- |
- |
R: Read only, R/W: Read and Write, -: Cannot access
|
|
|
|
|
Easy WebAccess Settings (recommended) |
|
|
 |

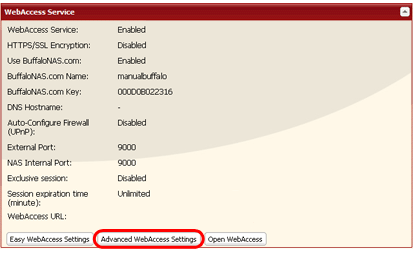
Click [Easy WebAccess Settings].
|
|
|
 |

|
|
| (1) |
Enable [WebAccess Service].
|
| (2) |
Enter [BuffaloNAS.com Name] (a name for your account with WebAccess).
|
 |
Write this name down in a safe place. You will need it to use WebAccess.
|
 |
If your LinkStation or TeraStation is left disconnected from the Internet for 60 days or more, your BuffaloNAS.com name and account may be deleted from the BuffaloNAS.com server.
|
 |
Note the BuffaloNAS.com key that is displayed when setup is finished. To register the same BuffaloNAS.com name during setup of another LinkStation or TeraStation, or after initialization of the unit, enter the BuffaloNAS.com key in the Web Admin interface.
|
WebAccess is now configured.
Next, register your LinkStation or TeraStation in WebAccess.
|
|
|
|
Advanced WebAccess Settings |
|
|
 |

Click [Advanced WebAccess Settings].
|
|
|
 |

|
|
| (1) |
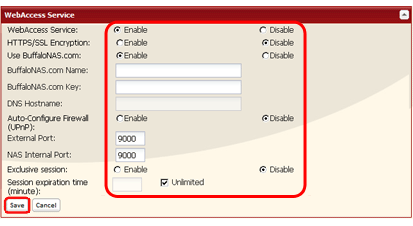
Enable [WebAccess Service].
|
 |
WebAccess for Windows Phone does not support SSL encryption. Make sure that HTTPS/SSL Encryption is disabled.
|
| (2) |
Enable [Use BuffaloNAS.com].
|
| (3) |
Enter [BuffaloNAS.com Name] (a name for your account with WebAccess).
|
 |
Write this name down in a safe place. You will need it to use WebAccess.
|
| (4) |
Use of BuffaloNAS.com is recommended for most users, but you may specify a different DNS service by entering its hostname in [DNS Hostname] field.
|
| (5) |
If your router supports UPnP, selecting [Enable] for [Auto-configure Firewall (UPnP)] is recommended.
|
 |
UPnP must be enabled in the router for this to work.
|
| (6) |
To configure the firewall manually without using UPnP, enter a port number in the [External Port] field.
|
 |
In the router's settings, forward this external port number to an internal port on your TeraStation or LinkStation on your local network.
|
 |
If UPnP is not used, set the router address conversion manually.
|
| (7) |
Enter [NAS Internal Port] (optional) for your TeraStation or LinkStation on your network.
|
 |
The default port number (9000) is recommended.
|
| (8) |
If [Exclusive session] is enabled, a user account cannot be used to log multiple computers in to WebAccess simultaneously. Only the last login will be active.
|
| (9) |
Enter a time in minutes (1 - 120) before inactive users are logged out of WebAccess, or select [Unlimited].
|
 |
If [Exclusive session] is enabled, [Unlimited] may not be selected for [Session expiration time (minute)].
|
 |
If your LinkStation or TeraStation is left disconnected from the Internet for 60 days or more, your BuffaloNAS.com name and account may be deleted from the BuffaloNAS.com server.
|
 |
Note the BuffaloNAS.com key that is displayed when setup is finished. To register the same BuffaloNAS.com name during setup of another LinkStation or TeraStation, or after initialization of the unit, enter the BuffaloNAS.com key in the Web Admin interface.
|
|
WebAccess is now configured.
Next, register your LinkStation or TeraStation in WebAccess.
|
|