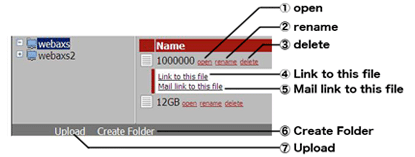
(1) |
[open] Opens a file or folder. |
|
Click [open] to open the specified file or folder.
|
(2) |
[rename] Renames a file or folder. |
|
Clicking [rename] will display the folowing screen. Change the name in the [File name] field as desired, and click [Change].

 |
• Do not use the following characters in a file or folder name:
• File and folder names may contain up to 80 characters including any extension.
• You must be logged in with an account you've created to use this feature. The admin and guest accounts do not support this feature.
|
|
(3) |
[delete] Deletes a file or folder. |
|
Clicking [delete] will display the following screen. Click [Yes] to delete the selected file.

|
You must be logged in with an account you've created to use this feature. The admin and guest accounts do not support this feature.
|
|
(4) |
[Link to this file] Links to a file or folder. |
|
Click a file or folder to open a white area. Right-click on [Link to this file] and select [Save link as . . .]. This will save a shortcut that you can give to other people to give them easy access to this file or folder. From the right-click menu, select [Add to Favorites] to bookmark an address link to this file or folder.
|
(5) |
[Mail link to this file] Sends an address link by email.
|
|
Click a file or folder to open a white area. Click on [Mail link to this file] and your mail software will launch with the link included in the body of the email. Use this feature to easily distribute this address link by email.
|
(6) |
[Create Folder] Creates a folder. |
|
Click [Create Folder] to display the screen shown below. Enter a name for the folder in the [Folder name] field, then click [Make]. The new folder will be created.

|
• Do not use any of the following characters in a file or folder name:
• File and folder names may contain up to 80 characters including any extension.
• You must be logged in with an account you've created to use this feature. The admin and guest accounts do not support this feature. |
|
(7) |
[Upload] Upload a file. |
|
Click [Upload] to display the following screen. Click [Browse] and select a file to upload. Click [Upload] to begin uploading the selected file.

To upload multiple files, click [Upload files] on the screen above.
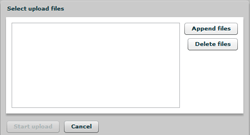
Click [Append files] and select a file to upload. Repeat until all desired files are selected. Click [Start upload] to upload the selected files.
|
• Up to 100 files may be uploaded at a time. Files up to 2 GB may be uploaded.
• You cannot upload a file if the same file name already exists on the destination drive. Before uploading the new file, delete the old file with the same name from the destination drive.
• You must be logged in with an account you've created to use this feature. The admin and guest accounts do not support this feature.
|
|
|
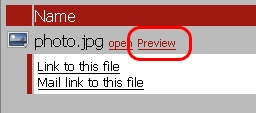
[Preview] Picture Preview |
|
Graphic files will have a link to preview the graphic. Click [Preview] to open the graphic in the browser.
Hover the mouse cursor over the top right of the image and  will appear. Click to display the next picture in the folder. will appear. Click to display the next picture in the folder.
You can also click  over the top left of the image to display the previous image.
Click over the top left of the image to display the previous image.
Click  at the bottom of the image to close the preview. at the bottom of the image to close the preview. |
|